
组件级别的状态管理,可以观察组件内变化和不同组件层级的变化,但需要唯一观察同一个组件树上,即同一个页面内。
在状态装饰器中 @State 是最基础的,使变量拥有状态属性的装饰器,也是大部分状态变量的数据源。
基础装饰器
@State 装饰器
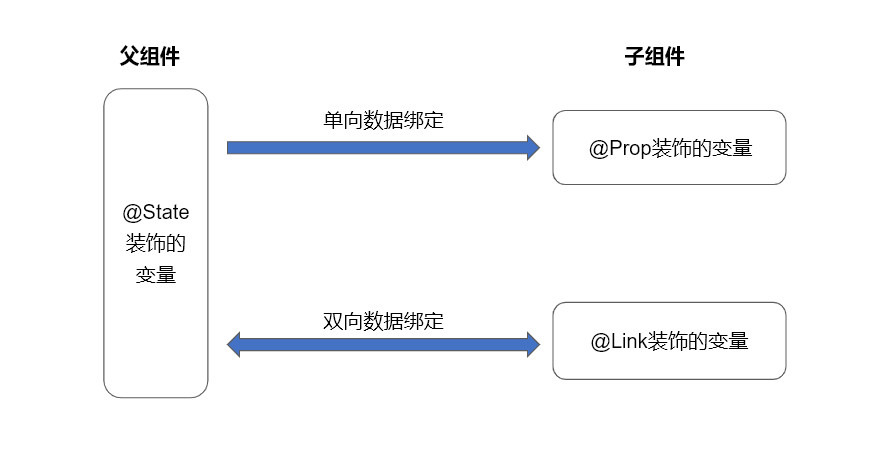
所装饰的变量拥有其所属组件的状态,可以作为其子组件单向和双向同步的数据源。当其数值改变时,会引起相关组件的渲染刷新。
@Prop 装饰器
所装饰的变量和父组件建立单向同步关系,允许组件内部修改@Prop装饰的变量,但修改后的数据不会同步到父组件。
需要注意:必须使用其父组件提供的@State变量进行初始化。
@Link 装饰器
所装饰的变量和父组件建立双向同步关系,@Link装饰的变量数据修改后会同步回父组件,父组件的更新也会同步给@Link装饰的变量。
之间的关系
用法示例
示例一:@State 和 @Prop
// 子组件
@Component
struct child {
  @Prop count: number

  build() {
    Column() {
      Text('子组件')
        .fontSize(40)
        .fontColor(Color.White)

      Text(`count:${this.count}`)
        .fontSize(40)
        .fontColor(Color.White)

      Button('count增加', { type: ButtonType.Normal })
        .fontSize(30)
        .padding(12)
        .margin({ top: 50 })
        .borderRadius(15)
        .backgroundColor('#fff')
        .fontColor('#ff40c1c1')
        .onClick(() => {
          this.count++
        })
    }
    .width('100%')
    .height('60%')
    .backgroundColor('#ff52d0d0')
    .margin({ top: 80 })
    .padding({ top: 50 })
  }
}


// 父组件
@Entry
@Component
struct parent {
  @State count: number = 1

  build() {
    Column() {
      Text('父组件')
        .fontSize(40)
        .fontColor(Color.White)

      Text(`count:${this.count}`)
        .fontSize(40)
        .fontColor(Color.White)


      // 子组件
      child({ count: this.count })
    }
    .width('100%')
    .height('80%')
    .backgroundColor('#8adddc')
    .margin({ top: 50 })
    .padding({ top: 20 })
  }
}
效果:
使用@Prop装饰的变量,修改后并不会同步到父组件。
示例二:@State 和 @Link
// 子组件
@Component
struct child {
  @Link count: number

  build() {
    Column() {
      Text('子组件')
        .fontSize(40)
        .fontColor(Color.White)

      Text(`count:${this.count}`)
        .fontSize(40)
        .fontColor(Color.White)

      Button('count增加', { type: ButtonType.Normal })
        .fontSize(30)
        .padding(12)
        .margin({ top: 50 })
        .borderRadius(15)
        .backgroundColor('#fff')
        .fontColor('#ff40c1c1')
        .onClick(() => {
          this.count++
        })
    }
    .width('100%')
    .height('60%')
    .backgroundColor('#ff52d0d0')
    .margin({ top: 80 })
    .padding({ top: 50 })
  }
}


// 父组件
@Entry
@Component
struct parent {
  @State count: number = 1

  build() {
    Column() {
      Text('父组件')
        .fontSize(40)
        .fontColor(Color.White)

      Text(`count:${this.count}`)
        .fontSize(40)
        .fontColor(Color.White)


      // 子组件
      child({ count:$count })
    }
    .width('100%')
    .height('80%')
    .backgroundColor('#8adddc')
    .margin({ top: 50 })
    .padding({ top: 20 })
  }
}
效果:
使用@Link装饰的变量,修改后会同步到父组件。
跨层级传递装饰器
@Provide装饰器与@Consume装饰器应用于与后代组件双向同步数据,在多个层级之间传递。
不同于上文提到的父子组件之间通过命名参数机制传递,@Provide和@Consume摆脱参数传递机制的束缚,实现跨层级传递。
需要注意:不允许在同一个自定义组件内,包括其子组件中声明多个同名或者同别名的@Provide装饰的变量
@Provide 装饰器
所装饰的状态变量自动对其所有后代组件可用。方便之处在于,开发者不需要多次在组件之间传递变量。
@Consume 装饰器
后代组件可通过使用@Consume去获取@Provide提供的变量。
用法示例
// 子组件【 D 】
@Component
struct childD {
  @Consume count: number

  build() {
    Column() {
      Text('第3层子组件D').fontSize(35)

      Row() {
        Text(`count:${this.count}`).fontSize(30)

        Button('清空', { type: ButtonType.Normal })
          .fontSize(24)
          .borderRadius(10)
          .onClick(() => {
            this.count = 0
          })
      }
      .width('100%')
      .padding({ top: 24 })
      .justifyContent(FlexAlign.SpaceBetween)

    }
    .backgroundColor('rgb(121, 187, 255)')
    .width('100%')
    .height('50%')
    .padding(12)
    .margin({ top: 50 })
  }
}

// 子组件【 C 】
@Component
struct childC {
  @Consume count: number

  build() {
    Column() {
      Text('第2层子组件C').fontSize(35)

      Row() {
        Text(`count:${this.count}`).fontSize(30)

        Button('数量x2', { type: ButtonType.Normal })
          .fontSize(24)
          .borderRadius(10)
          .onClick(() => {
            this.count *= 2
          })
      }
      .width('100%')
      .padding({ top: 24 })
      .justifyContent(FlexAlign.SpaceBetween)

      // 第3层子组件
      childD()
    }
    .backgroundColor('rgb(160, 207, 255)')
    .width('100%')
    .height('80%')
    .padding(12)
    .margin({ top: 50 })
  }
}


// 子组件【 B 】
@Component
struct childB {
  build() {
    Column() {
      Text('第1层子组件B').fontSize(35)

      // 第2层子组件
      childC()
    }
    .backgroundColor('rgb(198, 226, 255)')
    .width('100%')
    .height('80%')
    .padding(12)
    .margin({ top: 20 })
  }
}


// 父组件【 A 】
@Entry
@Component
struct parentA {
  @Provide count: number = 5

  build() {
    Column() {
      Text('父组件A').fontSize(35)

      Row() {
        Text(`count:${this.count}`).fontSize(30)

        Button('数量+1', { type: ButtonType.Normal })
          .fontSize(24)
          .borderRadius(10)
          .onClick(() => {
            this.count += 1
          })
      }
      .width('100%')
      .padding(24)
      .justifyContent(FlexAlign.SpaceBetween)

      // 第1层子组件
      childB()
    }
    .width('100%')
    .height('100%')
    .padding(12)
  }
}
效果:
父组件嵌套多层子组件情况下,使用跨层级传递的装饰器来装饰变量,无论在父组件还是后代组件中进行变量值修改,都会同步到父组件及后代组件中。
观察嵌套类对象属性装饰器
以上介绍的装饰器仅能观察到第一层的变化,适合非嵌套类的数据进行单双向数据绑定。
在实际应用开发中,应用会根据开发需要,封装自己的数据模型,对于多层嵌套类数据的属性变化是无法观察到的,这时候就需要用到 @Observed/@ObjectLink 。
@Observed 和 @ObjectLink 用于在涉及嵌套对象或数组的场景中进行双向数据同步。
单独使用@Observed是没有任何作用的,需要搭配@ObjectLink使用。
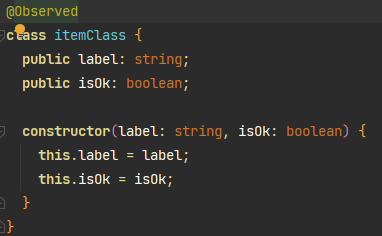
@Observed 类装饰器
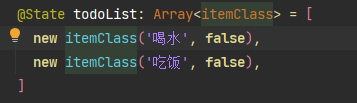
装饰 class,需要放在 class 的定义前,数据源使用 new 创建类对象。
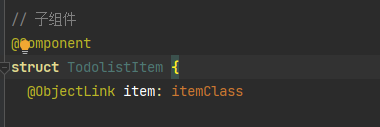
@ObjectLink 装饰器
在子组件中使用 @ObjectLink 装饰器装饰的状态变量,用于接收 @Observed 装饰的类的实例。
注意点:
- 不能在
@Entry装饰的自定义组件中使用; - 装饰的变量是只读的(不能被改变),但变量的属性是可以改变的,如果变量要赋值,请使用
@Prop;
用法示例
@Observed
class classA {
  public avatar: string
  public nick: string
  public status: number

  constructor(avatar: string, nick: string, status: number) {
    this.avatar = avatar
    this.nick = nick
    this.status = status
  }
}


// 子组件
@Component
struct child {
  @ObjectLink item: classA

  build() {
    Column() {
      Row() {
        Column() {
          Row() {
            Image(this.item.avatar)
              .width(50)
              .width(50)
              .borderRadius(90)

            Column() {
              Text(this.item.nick)
                .fontSize(24)

              Text(this.item.status ? '已邀请' : '未邀请')
                .fontSize(18)
                .margin({ top: 8 })
                .fontColor(this.item.status ? '#606266' : '#c0c4cc')
            }
            .margin({ left: 12 })
            .alignItems(HorizontalAlign.Start)

          }
        }

        Column() {
          if (this.item.status) {
            Button('取消', { type: ButtonType.Normal })
              .borderRadius(12)
              .backgroundColor('#909399')
              .onClick(() => {
                this.item.status = 0
              })
          } else {
            Button('邀请', { type: ButtonType.Normal })
              .borderRadius(12)
              .onClick(() => {
                this.item.status = 1
              })
          }
        }
        .alignItems(HorizontalAlign.End)

      }
      .width('94%')
      .padding(15)
      .backgroundColor('#eee')
      .margin({ bottom: 12 })
      .borderRadius(15)
      .justifyContent(FlexAlign.SpaceBetween)
    }
  }
}


// 父组件
@Entry
@Component
struct parent {
  @State list: classA[] = [
    new classA(
      'https://image.d2school.com/user/avatar/default/others/a.png',
      '不息de进步',
      0
    ),
    new classA(
      'https://image.d2school.com/user/avatar/default/others/d.png',
      '无限de仙境',
      0
    ),
    new classA(
      'https://image.d2school.com/user/avatar/default/others/f.png',
      '轻巧de狂澜',
      0
    ),
    new classA(
      'https://image.d2school.com/user/avatar/default/others/j.png',
      '浅红de豪情',
      0
    ),
    new classA(
      'https://image.d2school.com/user/avatar/default/others/x.png',
      '诚实de科学',
      1
    )
  ]

  build() {
    Column() {
      Text('好友').fontSize(40).margin(16)

      ForEach(this.list, (item) => {
        child({ item: item })
      })
    }
    .width('100%')
    .height('100%')
  }
}
效果: